Pre-Requisites
Please make sure that you have a reliable internet connection before trying to progress through this section. Without a reliable, working internet connection you will not be able to pickup your email! Many problems we see stem from trying to setup an Iridium connection AND our email software at the same time - and when it doesn't work you have twice as many problems to figure out!
It doesn't matter how you connect to the internet, but before you go any further verify that you can connect to the internet reliably and open up a small web page without any trouble, eg:
Login Details
Your username and password are supplied by MailASail. If you have lost them, then please contact: support@mailasail.com
These login details are required to access the system from both your email program and also if you are in an internet cafe and logging in via the webmail at: http://webmail.mailasail.com
Configuring Windows Live Mail on Win XP, 7, 8, 10 and onwards (using Red Box, or direct internet connection)
Create a New Account
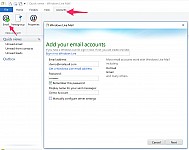
Setting up your teleport-mail account is much the same as setting up any email account:
- Create a new "account" in your Live Mail program
- Go through the setup steps and make sure that you enter the "Username" and "Password" correctly as per your MailASail account details.
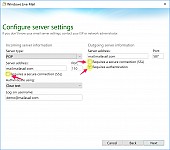
The other important questions are the server details. These are:
Checking the Mail Account Properties
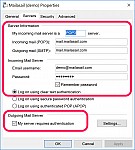
Once the account is created, you should double check all the settings, and also adjust a few other settings for maximum speed. In particular:
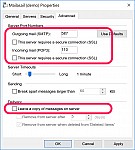
- (Optional) "Leave a copy of messages on server" - deselect this option (no tick) - this will ensure that emails are deleted off the server after downloading to the local computer. This will prevent them being received on other machines (bad), but the login time over handheld Iridium class devices can be substantial if there is a list of more than a few tens of messages left in the server Inbox (bad)
- "My server requires Authentication" - Ensure this option has a tick (select). This makes your email program send a username and password when you send mail as well as when you retrieve it. If this option is not set you will experience a situation where you will be able to retrieve mail, but not send it!
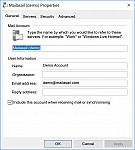
Checking the Live Mail Settings
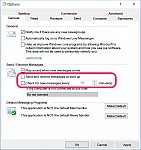
Finally, lets review the settings for the Live Mail email program itself. In particular it may be valuable to change the following settings:
- "Send and Receive messages at start-up" - this prevents Live Mail checking for new messages in the inbox immediately that you open the program. This is desirable on broadband, but might not be desirable over satellite. Adjust as preferred
- "Check for new messages every ..." - this prevents Live Mail automatically checking for new messages in the inbox every few minutes. This is desirable on broadband, but unlikely to be wanted (or at least not on a short frequency) on higher cost satellite devices as the costs are low for each check, but can add up.
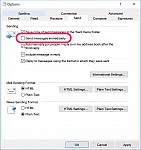
- "Send messages immediately" - this prevents Live Mail instantly sending emails after you press the Send button. This is very desirable on broadband. However, on some satellite systems there is effectively a minimum call cost to make the connection and so it can be more efficient to batch up emails - this option will cause the emails to wait in your outbox until you click the Send/Rcv button, so you can send them all out in a batch.
Disable SSL for Satellite Connections (Iridium/Inmarsat/etc)
For best speed, it's VERY important to disable SSL (encryption) on both incoming (POP) and outgoing (SMTP) email services. This is a trade off, security and lack of possibility of spying on your emails vs connect time... SSL connections add 45-60 seconds to the server connection time... This is generally too much of a penalty to be bearable for most users.
To do this, in the Mail Preferences page (as per above), check through the screens verify that all the settings as highlighted in the screenshots above. In particular ensure:
- SSL is turned off for BOTH incoming and outgoing servers
- Ports are specified as 587/110 (or 25/110 is acceptable)
For more technical information see:
Installing Windows Live Mail
If you are using a recent version of Windows then note that it does not come with an email program as standard. You should install your favourite program and configure as above. However, a nice easy to use and free option is Windows Live Mail (previously called Outlook Express in earlier versions of Windows). See below:
- Windows Live Mail does not come as standard with Windows 7. You will need to connect to the internet and download it.
The latest version is here: wlsetup-all-2010.exe - Once you have downloaded the installation file you will need to find where you saved it and double click on the icon the run the installation process. Follow the on screen instructions through to completion.
- Beware that a page appears half way through the installation process that asks you which programs you would like to install. If you click next it will install a whole host of programs that you could do without. We recommend to uncheck everything except Mail.
- There may also be a screen that will try and get you to set your default search engine to Bing and your homepage to something else that you don't want. You don't need to tick anything on this page.
- The final screen will appear and ask you if you have a Windows live ID. You can ignore this as well and just click close.
- You can now go to your start menu and under ALL PROGRAMS you will find Windows Live Mail. It is best to start this now before moving on to the configuration of your teleport-mail account. IT will ask you if you would like to add a new email account. You can click close or follow through as per the instructions above
Problems?
See our Debugging / Troubleshooting Section for a solution


