
MailASail's teleport-proxy service is a compressing web accelerator which will speedup web browsing by compressing web pages and blocking web adverts before they are sent to your browser. This in turn speeds up browsing the web and decreases the cost of doing so (eg with cellular and satellite connections such as BGAN/FleetBroadband where you are charged by the MB of data).
Note: even with the teleport-proxy, it's not practical to surf with a handheld Iridium phone as the connection speed is simply too slow, even with the optimisation. However, Iridium Pilot works very well for internet browsing!)
Configuration Overview
There are a couple of pre-requisites:
- You need a MailASail account
- Contact MailASail Support and request the teleport-proxy be enabled for your account
- We can support almost any operating system using one of the following web browsers:
- Mozilla Firefox
- Google Chrome
- Apple Safari
- Not supported, but Microsoft Internet Explorer will work (with some caveats)
- Additionally certain other applications can be configured to use a "proxy" and this can be used as a means to allow these applications limited web access when your firewall is set to prevent general web browsing. ie in conjunction with the Red Box router, you can effectively setup "per application" access to the internet.
There is no installation required to use the teleport-proxy. The only thing which is required is to change your web browser settings and ask the browser to send requests via our "compressing proxy server". Instructions to make these changes for various browsers are shown below.
If you do not already use Google Chrome (preferred) or Firefox as your internet browser, then now is your time to get up to date! We do not support Internet Explorer so please follow the links in the appropriate sections below to download a modern internet browser.
Common Settings for All Web Browsers
Specific instructions for various web browsers are below, but the settings common to all of them are as follows:
- Proxy Server Name: proxy.mailasail.com
- Proxy Server Port: 9696
- Username/Password: Your normal teleport-it account username/password
Configuring teleport-proxy with Google Chrome
Chrome is the preferred browser to use with teleport-proxy as it can use a new picture format which gives very high quality, but at a much smaller download size than "jpeg" images. The net effect is:
- Much faster speeds to download and display web pages
- Much smaller data cost to download pages
- Much higher quality images, despite the smaller amount of data transferred!
1. Get Chrome & Download Proxy On/Off Button
Follow the link below to download Google Chrome
Install the teleport-proxy extension for Google Chrome from the Chrome App Store. This extension makes it a very simple, single click, to switch between our teleport-proxy and a direct internet connection (i.e. your default connection).
To add the extension click on the link below using Chrome, and choose to install the extension.
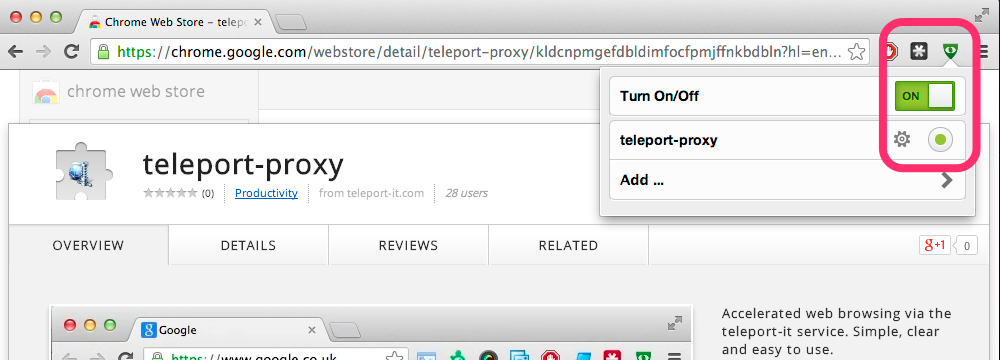
2. Enable/Disable teleport-proxy
Once installed a green/grey shield icon will appear in the top right corner of the browser, at the end of the address bar. Click the icon and then click the On/Off toggle to enable or disable the proxy.
3. Testing teleport-proxy
Enable the teleport-proxy, as above, so it turns green.
Now try and visit a web page in your web browser, eg http://www.mailasail.com
The browser should popup an authentication request. Enter your normal teleport-it username and password. The web page should now load correctly.
If it does not popup an authentication request then:
- Check that you have the teleport-proxy enabled (see section above)
Visit a few of your favourite webpages and note that they should open more quickly, without most adverts visible, and that some pictures may be a little lower quality than normal (but at the benefit of a large decrease in the amount of data downloaded)
Configuring teleport-proxy with Mozilla Firefox
1. Get Firefox & Download the Proxy On/Off Button
Follow the link below to download Firefox.
There is a nice little Add-on for Firefox called Quick Proxy. This allows you to simply turn the teleport-proxy off and on with the push of a button.
To download this handy little Add-on click on the TOOLS and then ADD-ONS you will be presented with a window showing you what extensions you have currently installed on Firefox. If you click on the GET ADD-ONS tab at the top and search on QUICKPROXY, you will be given the option to install the add-on and restart Firefox. You will now have a little icon in the bottom right hand corner of the screen that looks like this.
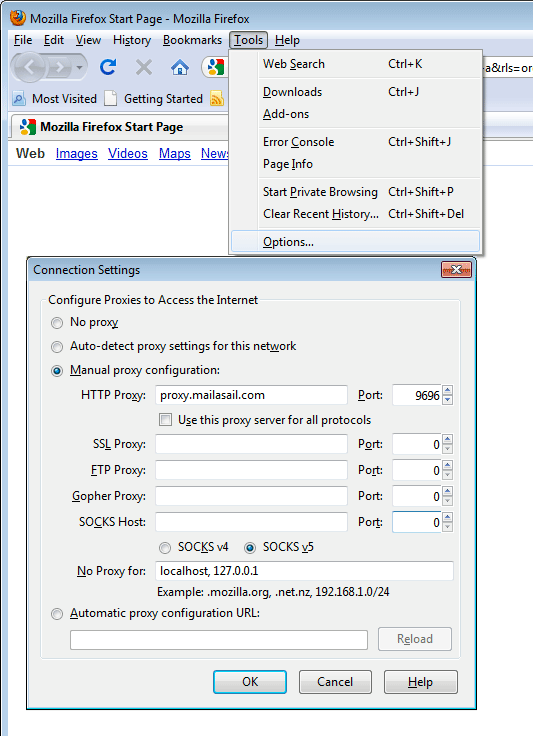

2. Change Firefox Settings
- Go into the Firefox Properties page ("Tools | Options" in Windows or "Firefox | Properties" on Mac OSX)
- Click "Advanced" and then select "Network"
- Click the Settings option which will open the "Configure Proxies to Access the Internet" page
- Choose
- "Manual Proxy Configuration", and enter:
- HTTP Proxy: proxy.mailasail.com
- Port: 9696
- Leave everything else at the default and click OK
- Click OK and close the Properties page
3. Testing teleport-proxy
Turn on the teleport-proxy by clicking the red 'P' button once so it turns green.
Now try and visit a web page in your web browser, eg http://www.mailasail.com
The browser should popup an authentication request. Enter your normal teleport-it username and password. The web page should now load correctly.
If it does not popup an authentication request then:
- Check that you have the teleport-proxy switched on down in the bottom right hand corner of the screen with a green P.
- If you right click on the green P you will get a list of options with radio buttons. Make sure that the top one is selected in each section.
Visit a few of your favourite webpages and note that they should open more quickly, without most adverts visible, and that some pictures may be a little lower quality than normal (but at the benefit of a large decrease in the amount of data downloaded)
NOTE: If you are using the teleport-proxy with a FleetBroadband then you will need to add an exception so that you can view the web interface on the FleetBroadband unit without having to turn off the teleport-proxy. As you can see in the screen shot opposite in the connection settings window there is a No Proxy option. You enter into this text box IP addresses that you do not want to use the teleport-proxy for. There will be some in there already, each one separated by a comma and then a space. After the last entry you need to enter a comma followed by a space and then 192.168.0.1 You can also add exceptions for any other IP address that you may need local access to, for example if you are using a router.
Configuring teleport-proxy with Apple Safari
Safari uses the operating system proxy defaults. This makes it a little fiddly to turn on and off
Configuring teleport-proxy with Windows:
- Control Panel | Internet Options | ...
Mac OSX
- System Preferences | Network | Choose your Network Connection | Advanced | Proxies
Internet Explorer
Some versions of Internet Explorer (notably IE6) do not properly support the use of web proxies by default.
IE 6-8:
Tools | Options | ....